WHAT’S HAPPENING!

Canoe Terminology!

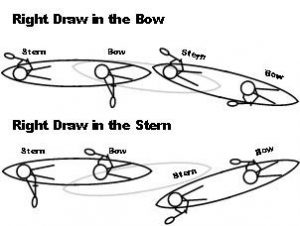
Every year, our canoeing instructor uses canoeing terminology that some of us have never heard of. Wonder what “river left” or “back ferry” means? Check  out “Announcements & News! (Membership Content) menu tab: CANOE TERMINOLOGY

Here you will find a collection of canoeing terms that have been collected over the last couple of years and that we may have all heard at one point or another during our canoe training and outings.

This will be a living list, so if you see something that is missing, incorrect or can add a term,  please use the comments section below to provide your input.

QUIZ (answers below)

What are “painters”? a) people who paint your house b) mesh that is woven for canoe seats c) rope attached to the bow and stern of canoes

What is a “lilydipper”?  a) a slow moving paddler b) the bottom portion of a paddle c) throw bag

What is a “lead boat”?  a) a boat filled with lead b) the first boat down the river c) the boat that tips first

ENJOY THE REST OF THE CANOE SEASON…THERE ARE SOME GREAT OUTINGS PLANNED. YOU CAN CHECK out THE SCHEDULE HERE!

Quiz answers:

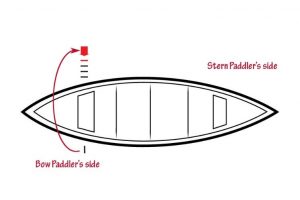
c) Painters – Line attached to the bow and stern of canoes, used for tying the boat ashore or lining the boat down through rapids. These should not be stored loose and should have no knots that can catch and hang up the canoe. Painters are also useful to grab hold of after a capsize, aiding in boat rescue and recovery, so that you can go paddling again next week.

a) Lilydipper – A dawdling, slow moving paddler. Also the moniker of a dawdling, slow moving Adirondack paddler of some repute.

b) Lead Boat – The first boat down the river in a trip. Hopefully this is someone who knows the river.


Safety on The Water! Paddle & Whistle Signals

Canoe safety is very important to the OSSCC which is why we insist every member take basic canoe training to assess skill levels and ensure members don’t go on excursions beyond their skillset and comfort zone.

That said, our canoe schedule has trips that accommodate everyone’s ability from our gentle “Easy Breezy” paddles on area lakes and rivers, to our more challenging trips on moving water. You can check our schedule on either the blog or on the web site to check out which trips you wish to go on.   Mark your calendars and watch your emails if the weather looks dicey on trip day!

Whichever trip you go on, it is important to be aware of both whistle and visual safety signals.

Be safe and have fun! Check out these posts before going out on the water:

Did You Forget Something? What to Bring on a Canoe Excursion

Check List for a Fun Day on the Water!

Remember not to schedule anything else on the same day as our canoe trips as we can’t guarantee when we will be back!


Check List For a Fun Day on The Water!

Our main goal whenever we set out on a canoe excursion is to have fun and be safe.  With that in mind, we have certain guidelines that we like to follow to make sure we can all have a fun day on the water.

With both our river training sessions and canoe excursions (schedule) beginning this week, here is a check list to show how everyone can pitch in to help make each outing run smooth:

  1. Make sure you are familiar with OSSCC Rules.
  2. When we get to the put in site, make sure you assist with unstrapping and transporting the canoes to the launch area as much as you are able.
  3. Pick out the correct size paddle for yourself. Ensure that you and your partner have secured an extra paddle and bailer to the canoe as well as obtained a throw rope and sponge from the canoe trailer.
  4. Secure your dry sack and personal belongings to the canoe.
  5. Don’t forget to put your PFD on! (No PFD = No Canoeing!)
  6. Carry the canoe to the water with at least one other helper. (Four makes it even better!)
  7. Place the canoe correctly in the water – no bridging (canoe must be floating completely on the water)
  8. Keep low when entering and leaving the canoe and keeping your weight centered  – see video
  9. Make sure you and your partner stay between the lead (first)  and sweep (last) canoes.
  10. When on the water, don’t crowd other canoes.  Stay at least a generous canoe length behind another canoe when moving down the river.
  11. Read the river as per training!
  12. Be in control of your half of the canoe.
  13. Always communicate with your partner if you need to change position so you don’t catch them by surprise (and cause a potential dunking:)!
  14. Work together with your partner at all times and take whatever opportunity you can to practice canoe maneuvers and strokes learned in your canoe lessons.
  15. At the end of the excursion, help to transport canoes back to canoe trailer and strap them in (as you are able), and/or return paddles, bailers, sponges and throw ropes into the canoe trailer.
  16. Bring extra cash……we always stop for a treat at the end of a canoe excursion as a reward for a job well done:)
  17. Don’t forget to give a little something to the driver if you are carpooling. (General guideline – $5 for short trips, $7 for longer trips)

If you happen to take any pictures…..please share!  We’d love to include them in the OSSCC gallery.

If you have any questions,  insights or suggestions, please share them in the comments section below!!

Have a great season!

What to Bring on a Canoe Excursion

When we go on any of our canoe excursions, whether they are for training or fun, someone always forgets something. Here is a checklist that should help you remember what to bring:

  • PFD (Personal Flotation Device) -Transport Canada approved and worn correctly
  • Emergency Contact card
  • waterproof whistle – attached to PFD
  • dry sac to hold a complete change of clothes (should you get wet), towel, rain gear, toilet paper, zip lock bags
  • lunch/snack (depends on excursion) in small cooler/lunch bag
  • water bottle (extra water for longer trips)
  • hat, sun glasses, sunscreen, insect repellent, lip balm
  • medical information, health card, personal medication
  • waterproof flashlight (extra batteries)
  • bungee cord, carabineers (to attach things to canoe), straps or elastic loops to hold in extra paddle
  • cell phone, camera in waterproof container
  • money to pay for trip  ($6 for shorter trips, $9 for longer trips)
  • money  “tip” driver if being carpooled (to say thanks!) (Guideline: $5 for shorter trips, $7 for longer trips)

For more information, check out “THINGS YOU SHOULD KNOW” on the OSSCC web page!

Did we forget something on this check list?  Let us know by posting a comment below.

Don’t forget to check the latest trip schedule! We will no longer be sending emails when there is an update or change.  If a trip is cancelled because of weather or river conditions, check your email for a blog notification as this will be posted on the blog.


Pry Stroke

The pry stroke is excellent for turning your canoe quickly or, if you’re solo, for moving sideways in the water. The opposite of a draw stroke, the pry stroke starts next to the canoe and pushes the water away.

  1. Sit or kneel in a stable position in your canoe.
  2. Hold the paddle correctly! To start the stroke, the shoulders should be rotated parallel with the gunnel so you are facing the stroke.
  3. Your shaft hand is on the gunnel about 6 to 8 inches behind the hip. The arm is bent.
  4. The grip arm is nearly straight and at a right angle to the keel line with your grip hand pushed out over the water.
  5. Insert the blade of the paddle vertically into the water directly next to the canoe on the side opposite the direction you wish to move.
  6. Rest your shaft hand on the gunwale. Pull with grip hand and push with your shaft hand.
  7. Use the gunnel of the canoe as a fulcrum (lever) for the paddle to push against the water.
  8. Turn the blade of the paddle sideways, perpendicular to the canoe, and slide it back through the water to the starting position to begin another stroke.

If you missed the other canoe stroke reviews, you can find them here:

Draw & Cross Bow Draw
J-Stroke & Canadian J-Stroke
Forward & Back Stroke

If you haven’t had a chance yet, check out the video Path of the Paddle for a good overview on all the canoe strokes.


Credits:
Photo: By MooseHead88 – Own work, CC BY-SA 3.0,
How to Paddle a Canoe: Strokes and Techniques -Erich Volkstorf
Five Essential Canoe Paddle Strokes – Karen Ingraham
The Stern Pry – Bob Foote

ATTENTION! Accounting Forms for Towers, Trip Coordinators, Expense Reimbursement

Hello all,

With the new canoe season fast upon us, there are some forms that we, as a club, use for accounting purposes. They are as follows and can be found on the “Forms & Schedules” page.

TOWING

If you have signed up to tow our canoes for our various excursions, you can be reimbursed for mileage. To get reimbursed, please note the following:

  1. Keep track of your mileage! (start to finish odometer readings)
  2. Fill out the “TOWING_MILEAGE EXPENSE FORM”
  3. The form must be filled out in FULL. Incomplete forms will not be accepted until complete; that includes the trip date, trip details & distance covered.
  4. The requesters name must be printed legibly, as well as a telephone number and complete address (if you want the cheque mailed to you.)
  5. Make sure you have all the boxes filled in and your totals calculated.
  6. If you are towing more than once, you can wait and submit the form later in the season….or submit a separate form for each trip you tow. Your choice.

TRIP CO-ORDINATORS

If you are coordinating a trip, the TRIP SHEET form must be completed in full. The totals on the sheet must match  the actual monies collected and be verified by a second party. If money is used from the amount collected for a trip expense, a receipt must be attached showing how the money was spent. The remaining cash and the receipt amount must match the money collected and noted on the sheet. If there is a discrepancy, please provide an explanation. Again, please make sure the form is completed in full.

EXPENSE REIMBURSEMENT

Should you incur an expense on behalf of club activities, you can be reimbursed using the EXPENSE REIMBURSEMENT form. You must attach an invoice or receipt. If there is no receipt or invoice, there must be clear documentation on the form to support the reimbursement request. If you have any questions or need clarification contact Carol Marion at eugcar.mario1978@gmail.com

Again, please use the above forms (I won’t be accepting any of the old ones).  For those of you who have difficulty with printing any of the above forms, there will be copies available in the shed for your use.

Regards,

Carol Marion, OSSCC Treasurer


Draw and Cross-Bow Draw Stroke

Besides the J-stroke and the forward strokes, there are other strokes we use to maneuver on the water, including the “draw” and “cross bow draw” strokes…..

Draw Stroke

This is a steering/turning stroke used by both bow person and stern person to pull the canoe to the paddling side. It can be used to move the canoe sideways, avoid obstacles and to turn the canoe around in a circle.

The draw is executed the same for both the bow and stern, but the effect is quite different. A right draw in the bow turns the boat to the right, while a right draw in the stern turns the boat to the left, and vice versa.

  1. Begin by maintaining proper form: hold paddle properly and sit up straight.
  2. Start the stroke by raising the paddle up, bringing the grip handle to about head level, and the shaft hand out to the side and not angled across the body
  3. As you are bringing the paddle up and out, rotate your torso to the side and place the blade vertically into the water at a comfortable distance from the canoe. Both arms are fully extended.
  4. Draw the paddle toward you through the water perpendicular to the canoe. You are actually pulling the canoe toward the paddle.
  5. When you stop pulling, your paddle should be vertical and practically touching the side of the canoe. Imagine pushing water under the canoe!
  6. To finish your draw, slice your paddle out of the water behind you, then feather around to the starting position for your next stroke.

Tip: Use the torso and upper body rotation to aid in the stroke to give maximum power. You shouldn’t be using your arms as much as you use the rotation of your torso.

Cross-Bow Draw Stroke (Bow )

Designed for the bow paddler, the cross-bow draw is like the draw stroke but done on the opposite, or “off,” side than you are paddling on. This stroke is used to quickly turn the canoe (pivot) and to avoid obstacles.

  1. To execute this stroke, it is essential to hold the paddle correctly.
  2. Keep that hold and lift the paddle over the bow by rotating your torso to place the blade in the water on the opposite side without changing your grip.
  3. Reach out and insert the blade of the paddle into the water away from the canoe and toward the front.
  4. Pull towards the canoe with your shaft hand and push with your grip hand to draw the paddle through the water so your paddle faces the bow of the canoe (your thumb on the grip hand will be facing away from you).
  5. By holding firm and not letting your paddle get pulled away from you, you’ll cause the canoe to turn towards your paddle.

To see out how these and how other strokes work, check out Path of the Paddle: Double Basics

Credits:
CanoeingBasics.com
Canoe Cross Bow Draw Stroke – Andrew Westwood
Illustration: By MooseHead88 (Own work) [CC BY-SA 3.0

J-Stroke & Canadian J-Stroke (Stern)

J-Stroke Basics (Stern)

The canoe J-Stroke is probably the most important canoe stroke to learn yet most recreational canoeists don’t even know it exists. Every person who has ever sat in a canoe knows how difficult it is to keep it going straight. The reason for this is that with every stroke of the paddle, the canoe wants to turn to the opposite side. The canoe J-stroke is the remedy to this problem and actually allows the canoeist to correct the direction of the canoe while paddling forward. This is a steering stroke used extensively by the stern paddler in tandem canoeing.

To perform this stroke, be sure that you are holding the canoe paddle properly and that you are sitting up straight.

  1. The J-stroke begins with the forward stroke and then the correction phase.
    • When your shaft hand reaches the point between your knees and hip, twist the power face of the blade away from the canoe and out.
    • Rotate the grip hand so that the thumb moves forward and down.
    • Keep a fairly loose grip with the shaft hand on your paddle to allow the shaft to rotate.
    • This movement will allow you to “pry” (push out) the blade out off the canoe’s gunwale, like a “J” and correct the direction of the canoe. (The Pry Stroke will be discussed in another post)
  2. Slice the blade out of the water and carry it flat (parallel) over the water and forward to begin the stroke again.

Tips:

  • J-stroke can be used as often as necessary, depending on the winds and currents, to keep the canoe moving in a straight line.
  • The more accustomed you become to this stroke, the more you’ll know how much to push out at the end.
  • The bow person (front of the canoe) should paddle on the opposite side from the stern person and should use the forward stroke. Both bow and stern persons should paddle in unison and use the same power of strokes to be most efficient.

Canadian J- Stroke

This stroke is similar to the J-stroke only the paddle stays in the water.

  1. Starts off the same as the J-stroke, but rather than pulling the blade out of the water at the end, the blade is “knifed” forward under the water. Then you are ready for the next power stroke without taking the blade out of the water.
  2. If done carefully, there is no sound from the paddle, making it possible to paddle in calm water without sound. This version of the J-stroke is more relaxing &  doesn’t make you as tired on longer trips.

Both strokes are demonstrated in the following video by Kevin Callan:

Credits:

George Sayour- Author (article) January 3, 2018
Canoe Paddle Strokes – Wikipedia
The Canadian Stroke – Kevin Callan
Photo: By MooseHead88 – Own work, CC BY-SA 3.0
Paddle Canada – Canoe Strokes Resource Document
How to Paddle a Canoe: Strokes and Techniques – Erich Volkstorf

Forward and Back Stroke

Forward Stroke (Power Stroke)

The “forward stroke” is, quite simply, the stroke that moves your canoe forward and is used mainly by the bow person in tandem or doubles canoeing.


Though the forward stroke may appear to be simple, there are lots of ways to do it wrong. The goal is not to simply to move your canoe forward, but to move it forward with the greatest power and efficiency possible so you don’t waste energy and possibly hurt yourself.

To start this stroke (the wind-up), the grip hand, (the hand at the top of your paddle shaft), should be at about chin level and away from your face. Lean slightly forward with both the shaft and grip hands and rotate your torso forward as you place the paddle in the water.

Keeping your arms slightly bent, draw the paddle straight back through the water with the face of the blade perpendicular to the water, twisting your torso through the stroke (catch and power phase). This is done by applying forward pressure (like a punch) with your grip hand and using your shaft hand as the pivot point (fulcrum), so the paddle is used like a lever. The shaft hand should be loose for easier rotation of the shaft. The power of the stroke comes from your torso and hips, not from your arms.

To complete the stroke (recovery phase), slice your paddle out of the water up by dropping the grip hand and rotating the wrist so the grip hand thumb is pointing forward and then “feathering” around to your starting position just skimming the water. (“Feathering” simply means swinging the blade forward, flat above the water’s surface so it cuts through the wind instead of catching it.)

Back Stroke (Reverse Stroke)

This stroke is the reverse of the forward stroke where you rotate your torso toward the stern and place the paddle in the water to the rear of your body. You then push forward with the shaft hand and pull with the grip hand. Unwind the torso until the shoulders are square with the gunwales with the shaft hand fully extended. Complete the stroke by lifting the blade out of the water and arcing the shaft hand backward over the water and dropping the grip hand to chest level.

This stroke can be used to stop the canoe or to back up for hazard avoidance, to ferry across the current, or hold position in a current.

Hopefully this post will help you understand these basic strokes much better. Once you see these strokes in action and actually get to practice them, you will get a better understanding of how they work!

In case you missed them, here are other posts that might be of interest to you:

Path of the Paddle: Doubles Basics

Parts of a Canoe & Paddle

Just a reminder that you have a chance to practice these and other strokes at the “Victoria Pond” practice session and other canoe outings.

Credits:
Forward Stroke – CanoeingBasics.com
Paddle Canada, Canoe Strokes Resource Document, 2012
Different Strokes for Canoeing Folks – Karen Berger
Five Essential Canoe Paddle Strokes – Karen Ingraham
Photo: By MooseHead88 – Own work, CC BY-SA 3.0,

Path of the Paddle: Double Basics

In keeping with providing resources to our OSSCC members to prepare you for the upcoming canoe season, here is a short film from the late canoe guru Bill Mason and his son Paul where they demonstrate the basic doubles paddling strokes and how to apply them in various combinations. It is interesting to see how the strokes are applied in faster moving water as well as still water, however, the emphasis is always on working as a well-coordinated team.  Although the film, is circa 1977 from the National Film Board of Canada, the information provided is still pertinent. Enjoy!

Path of the Paddle: Doubles Basic, Bill Mason, provided by the National Film Board of Canada